The Polkadot.js extension manages accounts and facilitates the signing of transactions with those accounts. It is not a full-featured wallet like MetaMask. The extension is a secure option that can also protect you from known phishing sites. The Polkadot.js extension is able to inject your accounts into apps such as the Polkadot.js Apps. From there, you can initiate a transaction, and the Polkadot.js extension allows you to sign and submit that transaction.
The Moonbeam Foundation recently announced the full details of participating in Moonbeam’s crowdloan. The crowdloan will enable Moonbeam to launch as a parachain on the Polkadot network, bringing 70+ projects and integrations to the Polkadot ecosystem for the first time. In contributing to the Moonbeam crowdloan, users lock their DOT tokens for a two year period and receive GLMR tokens as a reward.
DOT holders have three ways to participate in the Moonbeam crowdloan. They can contribute to the crowdloan via the Moonbeam Foundation application, through participating exchanges, and select wallets to be announced. If you are participating through the Moonbeam Foundation dApp, the easiest and recommended way to participate is via an account in the Polkadot.Js Extension.
In this tutorial, you’ll learn how to set up a Polkadot address with the Polkadot.js extension.
Download the Polkadot.js Extension
To download the Polkadot{.js} Extension, head to this link: https://polkadot.js.org/extension/. Once installed, you’ll be prompted to accept the terms and conditions and then you’ll be greeted by this screen:

Create an Account
It is recommended that you read through the remainder of the instructions in this tutorial in their entirety and then take the following steps in the extension. If you navigate away from the extension and return to it before completing the process, the account will not be saved. In order to create an account, first, take the following steps:
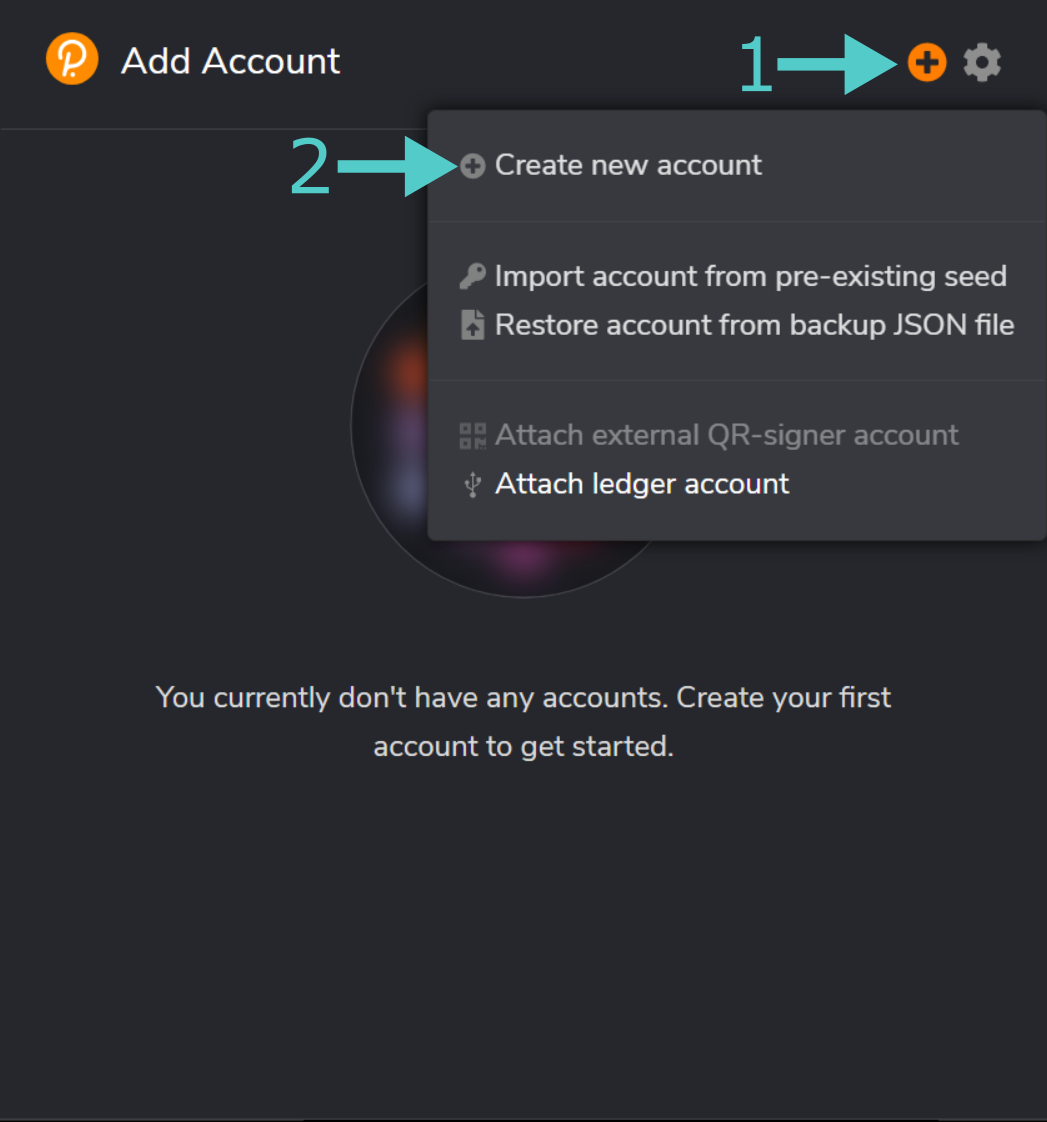
- Click on the “+” in the upper right corner
- Next, click on “Create new account”
This will open the “Create an account” wizard. In the first page, the 12-word mnemonic seed is shown. Make sure you backup your twelve-word mnemonic seed. The words must be kept in the exact order displayed on your screen. For more information on storing your mnemonic seed safely, see this link. In here you need to:
- Once you have your mnemonic seed securely backed up, check the corresponding box
- Click on the “next step” button

Note: DO NOT share your seed with anyone. Your seed grants full access to ALL of your funds stored in that account and any derived accounts.
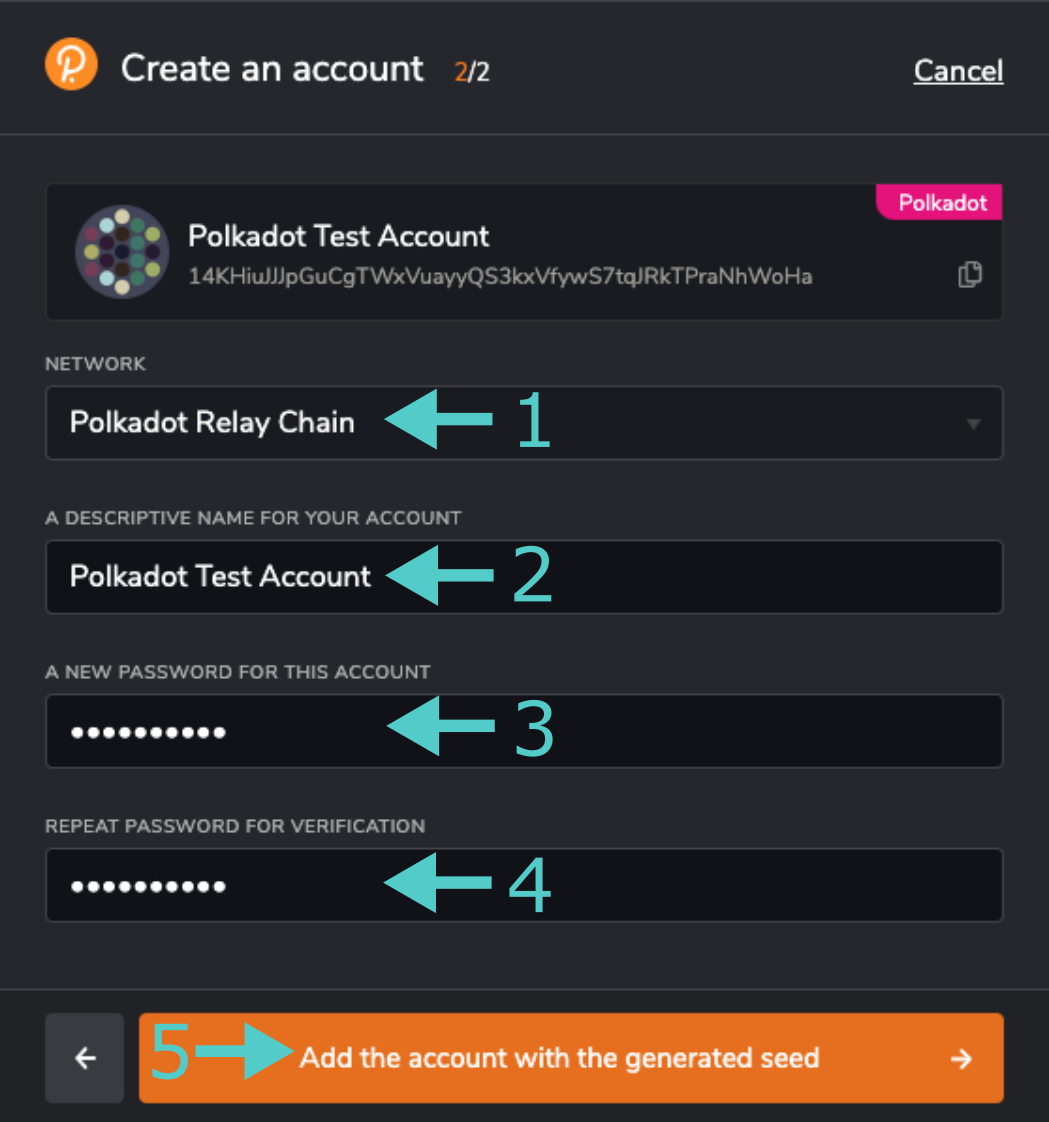
On the second page of the wizard, take the following steps:
- Select the network you wish to use this account in. For this case, select “Polkadot Relay Chain”. This ensures that the address being displayed is a valid Polkadot address. You can also select to use the account on any chain, but this means you’ll have to regularly change the account display format so that it is valid for that chain. If you want to learn more about accounts in Polkadot/Kusama check this link
- Give this account a descriptive name
- Set a password, this will be used when signing transactions
- Confirm the password
- Click “Add the account with the generated seed” to complete the account generation
Note: This password does NOT protect your seed phrase. If someone knows the twelve words in your mnemonic seed, they still have control over your account even if they do not know the password.
And we’re done! You now have an account dedicated to the Polkadot Relay Chain ready for use!