This is an updated version of the article that was originally published on January 11, 2022 and updated on March 10th, 2023. This new update includes changes to the Moonbeam dApp.
This tutorial will guide you through the process of claiming your Moonbeam crowdloan rewards using the Moonbeam dApp.
The dApp supports Moonbeam, Moonriver and Moonbase Alpha (in case you’d like to test any steps on TestNet). The dApp is also a perfect place to perform cross chain transfers, manage staking, and keep tabs on network governance. The Moonbeam dApp supports a variety of wallets so you can use your preferred EVM wallet to claim your crowdloan rewards.
Get Started with the Dashboard
To get started with the dashboard, navigate to apps.moonbeam.network/moonbeam and press Connect Wallet in the upper right corner. Click on your desired network if it isn’t already selected. Then click on the EVM wallet you’d like to use with the Moonbeam dApp.
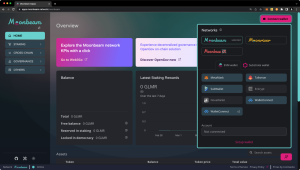
Your preferred EVM wallet will pop up and ask you to sign in. Once signed in, you will be prompted to select the account to connect to the dApp with and accept permissions. Remember to connect the EVM account that you specified as your rewards address during the crowdloan. If you don’t recall the rewards address that you specified, you can look it up on the Crowdloan dApp.

You will also need to connect MetaMask to Moonbeam. Moonbeam GLMR tokens are native protocol tokens on the Moonbeam network. Therefore, you must add Moonbeam as a custom network in MetaMask. If you need help connecting to the network, please check out our documentation on connecting MetaMask to Moonbeam.

Upon accepting permissions and changing the network to Moonbeam, you’ll be redirected to the main dashboard, where you’ll find details about your account balance, last transactions, and staking data.
If you’d like to change the network the dApp is connected to, you can do so by clicking the button under the network icon in the top left corner, and selecting a different network. For testing purposes, you can switch to Moonbase Alpha and interact with the dApp on TestNet. However, to claim your GLMR tokens, you need to be connected to the Moonbeam network.
How to Claim Rewards
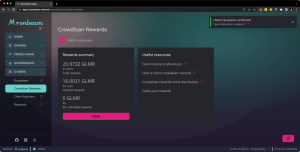
To get started, navigate to the Crowdloan Rewards page if you haven’t already. It can be found under the Others dropdown. There, you’ll find your lifetime total rewards, the amount of rewards you’ve claimed so far, and the amount of available rewards you can claim at that moment.
For the Moonbeam Crowdloan, 30% of the rewards were already distributed to contributors. The Claim button is for the remaining 70%, which are linearly vested over the 96 weeks of the parachain lease period. These can be claimed on a block-to-block basis, but a transaction fee must be paid. To claim your rewards, take the following steps:
- Navigate to the Crowdloan Rewards page
- Click Claim
- Confirm the transaction in your EVM wallet
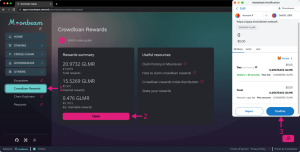
Upon seeing a Claim transaction confirmed notification, all of your available pending rewards will be delivered and your balance on the dashboard will increase to include your claimed rewards.
That’s it! You have successfully claimed your pending crowdloan rewards using the Moonbeam dApp. You can return to the Moonbeam dApp to claim your accrued rewards at any time.